
VolSync - Kubernetes Volume Replication Made Simple
Pre-requisites
Have you ever wondered how to replicate volumes between Kubernetes clusters or namespaces? If not, then this article might pique your interest. It will guide you on how to accomplish this using VolSync and demonstrate database replication between two MySQL instances.
Now let’s get down to business and shift our focus to the demo. In general, I have prepared code for a demo that sets up a 3-node Kind cluster, installs VolSync for volume replication, and creates two MySQL instances in separate namespaces with automated data synchronization between them.
Architecture Overview
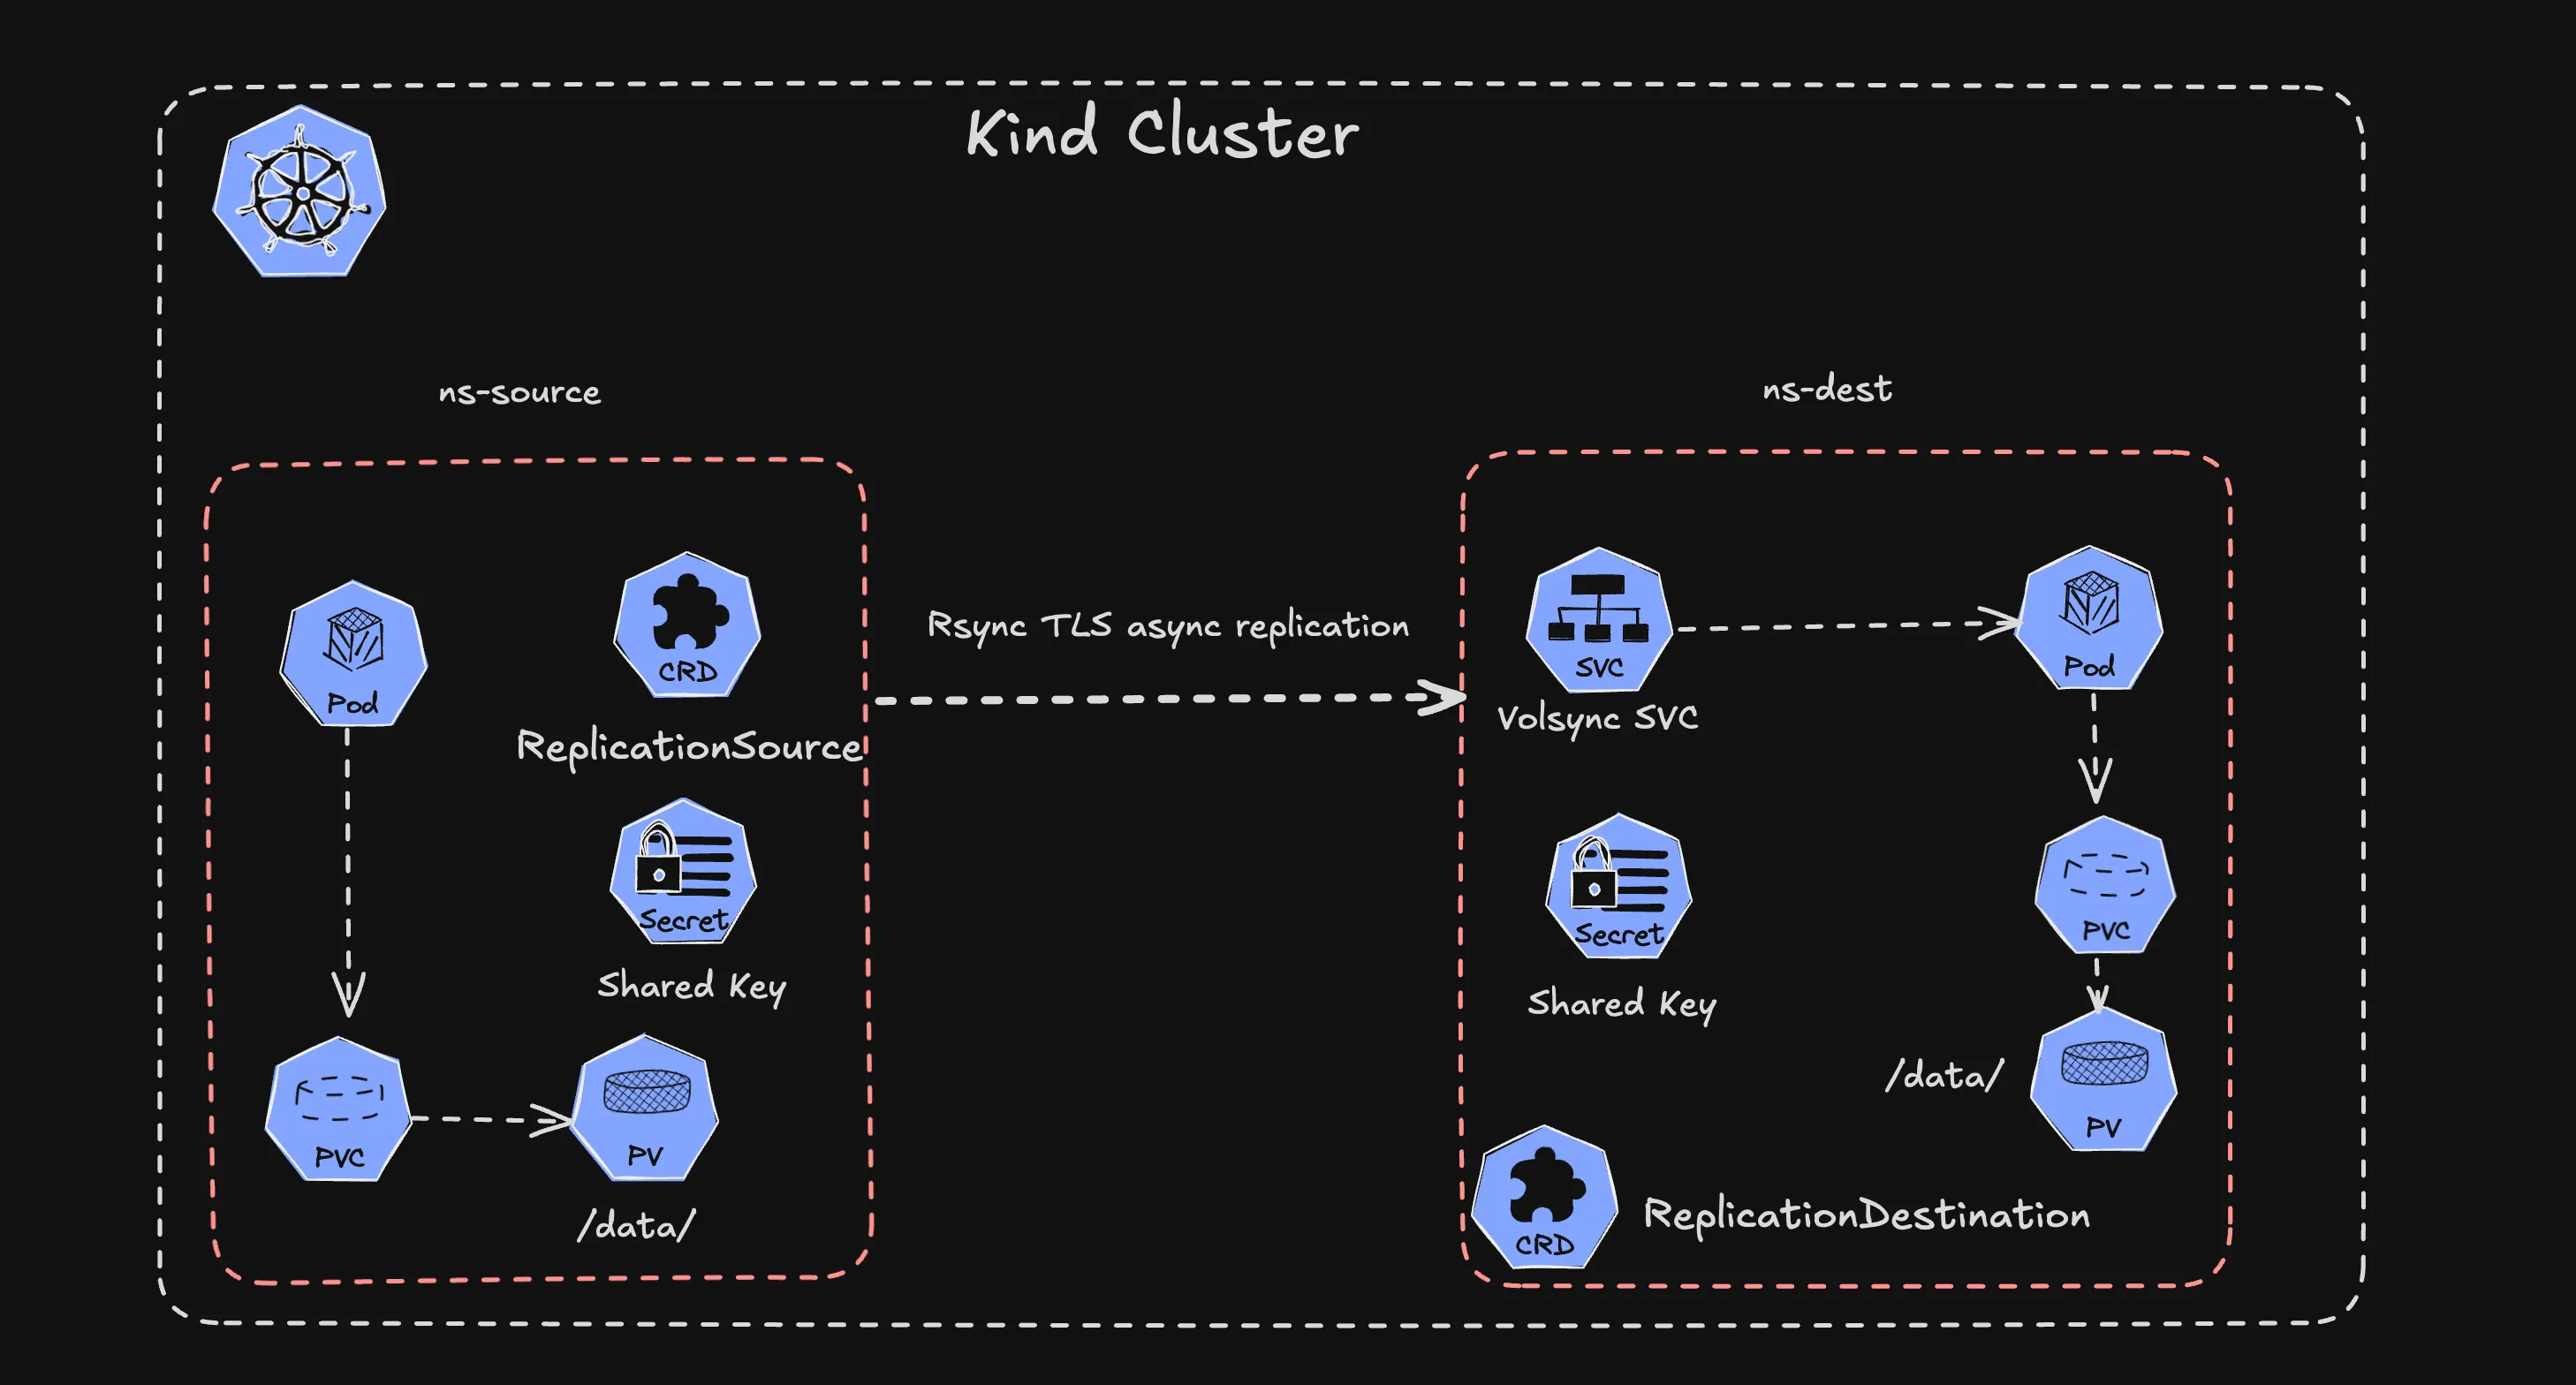
The architecture consists of:
- Kind Cluster: 3-node cluster (1 control-plane, 2 workers) with shared storage
- VolSync Operator: Manages replication between volumes
- Source MySQL: Primary database in
ns-sourcenamespace - Destination MySQL: Replica database in
ns-destnamespace - Rsync-TLS: Secure replication protocol for data transfer
Setup Instructions
1. Create Kind Cluster
First, create the Kind cluster with the custom configuration:
kind create cluster --config kind-cluster.ymlThe cluster configuration includes shared storage mounts for persistent volumes:
kind: Cluster
apiVersion: kind.x-k8s.io/v1alpha4
name: csi-cluster
nodes:
  - role: control-plane
    extraMounts:
      - hostPath: /tmp/kind-csi-storage
        containerPath: /var/local-path-provisioner
  - role: worker
    extraMounts:
      - hostPath: /tmp/kind-csi-storage
        containerPath: /var/local-path-provisioner
  - role: worker
    extraMounts:
      - hostPath: /tmp/kind-csi-storage
        containerPath: /var/local-path-provisioner
2. Install VolSync
Install the VolSync operator using Helm:
helm repo add backube https://backube.github.io/helm-charts/
helm install --create-namespace -n volsync-system volsync backube/volsync
3. Create Namespaces
Create separate namespaces for source and destination databases:
kubectl create namespace ns-source
kubectl create namespace ns-dest
4. Install MySQL Instances
Add the Bitnami repository and install MySQL in both namespaces:
helm repo add bitnami https://charts.bitnami.com/bitnami
helm repo update

# Install MySQL in source namespace
helm install mysql bitnami/mysql -n ns-source \
  --set auth.rootPassword=mypassword \
  --set primary.podSecurityContext.enabled=false \
  --set primary.containerSecurityContext.enabled=false

# Install MySQL in destination namespace
helm install mysql-dest bitnami/mysql -n ns-dest \
  --set auth.rootPassword=mypassword \
  --set primary.podSecurityContext.enabled=false \
  --set primary.containerSecurityContext.enabled=false
5. Configure Replication
Create a shared encryption key for secure replication:
KEY=1:$(openssl rand -hex 32)
kubectl -n ns-source create secret generic replication-key --from-literal psk.txt=$KEY
kubectl -n ns-dest create secret generic replication-key --from-literal psk.txt=$KEY
Apply the replication configuration:
kubectl apply -f replication-source.yml
kubectl apply -f replication-dest.yml
Replication Configuration
ReplicationSource
apiVersion: volsync.backube/v1alpha1
kind: ReplicationSource
metadata:
  name: mysql
  namespace: ns-source
spec:
  rsyncTLS:
    address: volsync-rsync-tls-dst-mysql.ns-dest.svc.cluster.local
    copyMethod: Direct
    keySecret: replication-key
  sourcePVC: data-mysql-0
  trigger:
    manual: sync-1752130636
    schedule: '*/5 * * * *'
ReplicationDestination
apiVersion: volsync.backube/v1alpha1
kind: ReplicationDestination
metadata:
  name: mysql
  namespace: ns-dest
spec:
  rsyncTLS:
    copyMethod: Direct
    keySecret: replication-key
    destinationPVC: data-mysql-dest-0
    moverSecurityContext:
      fsGroup: 999
      runAsGroup: 999
      runAsNonRoot: true
      runAsUser: 999
    serviceType: ClusterIP
Testing the Replication
1. Add Test Data
To verify that VolSync is working correctly, we’ll create test data in the source MySQL instance and observe its replication.
Step 1: Connect to the source MySQL instance
# Connect to the MySQL pod in the source namespace
kubectl -n ns-source exec -it sts/mysql -- bash

# Inside the pod, connect to MySQL
mysql -u root -p
# Enter password: mypassword
Step 2: Create test database and data
-- Create a test database
CREATE DATABASE IF NOT EXISTS testvolsync;
USE testvolsync;

-- Create a sample table
CREATE TABLE IF NOT EXISTS users (
    id INT PRIMARY KEY,
    name VARCHAR(50),
    created_at TIMESTAMP DEFAULT CURRENT_TIMESTAMP
);

-- Insert test data
INSERT INTO users (id, name) VALUES
    (1, 'Alice'),
    (2, 'Bob'),
    (3, 'Charlie');

-- Verify data was inserted
SELECT * FROM users;
SELECT 'Test data successfully added to source database' as status;
Step 3: Verify database creation
-- Check that our test database exists
SHOW DATABASES;
Expected output:
+--------------------+
| Database           |
+--------------------+
| information_schema |
| mysql              |
| performance_schema |
| sys                |
| testvolsync        |
+--------------------+
Step 4: Exit MySQL
EXIT;# Exit the pod
exitNote: The test data is now created in the source MySQL instance. The next step is to monitor the replication process to ensure this data gets synchronized to the destination.
2. Monitor Replication Status
Check the replication status:
# View all replication resources
kubectl get replicationdestination,replicationsource -A

# Check source replication result
kubectl get ReplicationSource mysql -n ns-source -o jsonpath='{.status.latestMoverStatus.result}'

# Check destination replication result
kubectl get ReplicationDestination mysql -n ns-dest -o jsonpath='{.status.latestMoverStatus.result}'

# Check destination conditions
kubectl get ReplicationDestination mysql -n ns-dest -o jsonpath='{.status.conditions[*].message}'
3. Verify Data Replication
Initially, the destination database won’t show the replicated data until MySQL is restarted:
kubectl -n ns-dest exec -it sts/mysql-dest -- bash
mysql -u root -p
-- Before restart - no testvolsync database
SHOW DATABASES;Restart the destination MySQL to mount the replicated data:
kubectl -n ns-dest rollout restart statefulset mysql-destAfter restart, verify the data has been replicated:
-- After restart - testvolsync database should be present
SHOW DATABASES;
USE testvolsync;
SELECT * FROM users;
Key Features
- Automated Scheduling: Replication runs every 5 minutes
- Secure Transfer: Uses rsync-TLS with pre-shared keys
- Direct Copy: Efficient direct volume-to-volume copying
- Cross-Namespace: Works between different Kubernetes namespaces
- Persistent Storage: Handles StatefulSet persistent volumes
Monitoring and Troubleshooting
Check Pod Status
kubectl get pods -n ns-source
kubectl get pods -n ns-dest
View Logs
kubectl logs -n volsync-system -l app.kubernetes.io/name=volsyncManual Trigger
You can manually trigger replication by updating the manual trigger value in the ReplicationSource.
Summary
In this article, I showed you how to implement volume replication in Kubernetes using VolSync. The demo demonstrates:
- Setting up a multi-node Kind cluster
- Installing and configuring VolSync
- Creating secure replication between MySQL instances
- Monitoring and verifying data synchronization
This approach provides a robust foundation for implementing disaster recovery, cross-cluster replication, and data migration scenarios in Kubernetes environments.
Related Posts
External-DNS - Automated DNS Management for k3s Homelab
Set up and configure External-DNS for automated DNS record management in your k3s homelab environment with popular DNS providers.
Atlas - manage your database schema as code
Manage database migration schemas using the declarative approach in the modern DevOps world.
Velero - Kubernetes Backup and Restore Made Simple
Master Kubernetes cluster backups, disaster recovery, and data migration with Velero in your Azure Kubernetes infrastructure.